The objective here is to build a portable guitar preamp that I can carry around and gig with different people. It can also replace the preamp section of my guitar amp, which is a Peavey, and borrow the sounds of Fender/ Marshall/ Vox from its tonestack.
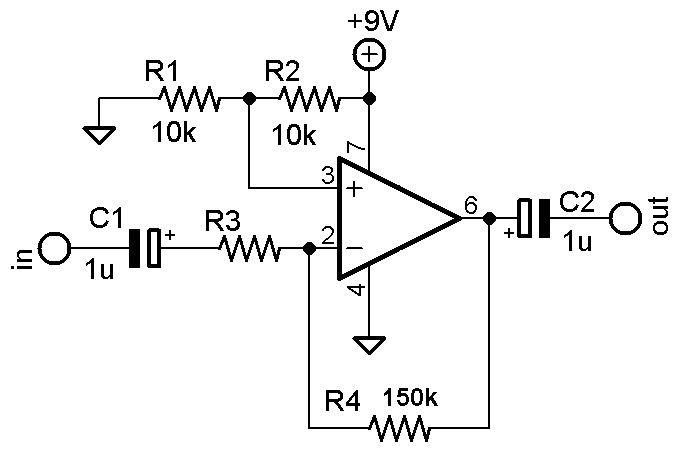
I did not design the schematics myself. Since my objective is to make this preamp portable, I searched for the simplest preamp design and found this from www.redcircuits.com . This is called a Solid-state Fender Blackface Preamp, which is a transistor version of the original valve circuit from the Fender Blackface.

I then borrow the tonestack from the Tonemender that is found at www.runoffgroove.com . The Tonemender is a booster with a very flexible tonestack, which can re-create the Fender, Marshall and Vox responses.
Fishman Presys Vt1 Piezo Pickup Acoustic Guitar Mic Blend Preamp Eq Diy Tuner
Details of these schematics can be found at the links above, which explain clearly what these circuits do and how they work.
Merging the 2 circuits found, I laid out the board of this little preamp. One thing to note is that pinout of the FET can be different, so it is wise to check the spec sheet from the manufacturer. If the pinout is the same as the ones I use, you should be able to build this project by using the same layout.
It took me some time to draw the layout (which was my first time), but it actually saved a lot of time for me to build the board.
Tube Preamp Pedal (update)
Not much to explain here. Just solder the parts according to the layout. It is always a good idea to test the board before putting the off board parts all together.
I used shielded wires for the signal path. More work and time is needed in soldering and grounding, but I think it surely worth it.
Just put all the wires nicely and carefully into the box. Use some cable ties whenever suitable. Label the switches and knobs. Yes. I am a Dymo lover!
Diy Electric Guitar Manual Effector Bb Preamp Distortion Excitation Overload Preamp Single Piece Effector Pcb Board
Finally, the preamp was connected to my Peavey that has the preamp in/ out at the back. Remember to turn the volume all the way down before switching on anything, just in case.
I also tested the preamp using a pair of headphones and it worked fine for me, so it can also be doubled as a little practice headphone amp. A bonus.
The only problem I found with this preamp is that it has too much gain, so only about 1/5 of the volume knob is usable in my settings and adjusting the volume to level with others' instrument could be a problem. But I also doubted that it depends on the power amp, so I have not made any changes to the part values yet. Any suggestions on this are welcomed.2018 update: I built an improved version which features all three channels from the original and simplified switching circuit. I suggest checking out the Soldano Preamp MK2 project.
.jpg?strip=all "style=width:100%;text-align:center;")
Amazon.com: Guitar Pickup, Sg 20 Silent Guitar Eq Equalizer Pickup With Tone Volume Control Knob For Luthier Diy Parts
This preamp is part of a bigger picture idea I had in mind. To build a couple of bare-bone preamps, no switching, no EQ and other nonsense, to get a decent graphic EQ pedal and to build digital logic for switching them. Concept of having digital circuits only control all-analog signal path was always interesting to me and this preamp is the first step in that direction.
I wanted to start with a high gain preamp that will cover Dream Theater grounds, so I started off with Soldano SLO 100 design. I removed the tone stack, FX loop, clean channel and the power amp. Later I found that it’s actually closer to the x88r preamp. Removing the clean channel left me with a spare triode in the first tube. I decided to wire it in parallel with the first gain stage. To compensate for the change, the first plate resistor is lowered to 120K so that each triode sees 240K (close enough to stock 220K value) and I put two 1.8K||1uF pairs on the cathodes as I didn’t have 900ohm resistors, nor 2uF caps. With those changes, parallel stage should be biased about the same as in the stock circuit. Benefits of the parallel stage should be lower noise, a bit less treble due to doubling of Miller effect and more complex tone, since two triodes are never the same. I also included cathode follower mods suggested by Merlin that’s supposed to reduce the stress on tube during startup without affecting the tone. Finally, I decided to use 12.6DC heaters, regulated and heavily filtered. Heaters are also elevated to 75V to make cathode follower tubes’ lives easier. Without the elevation cathode followers are operating at higher cathode-grid voltage than they should, according to data sheet – Vh-k(max)=180V.
I found a nice sheet metal pre-painted box in the local store that seemed OK for the job. What’s nice about it is that every panel may be removed individually which makes it easier to install boards, and mess with the circuit later. Front and back panels are aluminum and the rest of it is steel.
Guitar In My Modular, Which Diy Module Pre Amp?
For circuit boards I decided to use some pre-made generic turret board and tag board I had lying around. Making circuit boards is not my favorite part of making amps, especially drilling boards, so these boards saved me some times and nerves.
I got both secondaries center-tapped because it’s easier to layout full wave rectifier with only two diodes and it doesn’t require virtual center tap to elevate the heaters. 14VAC are there to provide few extra volts before the regulator.
Both volume and gain pots’ wipers are connected to the board using shielded teflon wire. Shield is grounded on the board side and connected to the pin 3 on the pot. That way pot is grounded together with the stage it controls.
Guitar Preamp Circuit Using 12au7
Starting off with the power supply boards. The board on the left is for high voltage power supply and heater elevation circuit. The heater supply board is shown on the right. 7812 regulator used for heaters is not shown here because it’s mounted on the chassis with thermal paste and mica insulator to prevent it from shorting with the chassis. Since the regulator body is connected to the center pin, it is also elevated to 75V so it has to be isolated from the grounded chassis.
Here’s the main board wired to the tube rail. You can’t see the filter caps because they are mounted on the other side of the board.
While testing I used cheapo Chinese tubes but later they got replaced with JJ tubes. JJs sound warmer and are less noisy. Also two of the Chinese tubes turned to be microphonic. I’m not buying them any time soon.
Easy Diy Pre Amp: Makes Piezo Equipped Cigar Box Guitars Sound Better
Wiring for the first tube. I made terminal with a single eyelet mounted on a piece of fiber board screwed to the rail using a L shaped aluminum profile. It works pretty well as strain relief. I don’t like soldering grid resistors directly to the lead. It will eventually break while moving the lead around.

The second tube uses the same way of mounting the grid resistor. Since I’m running the heaters in series pin 9 is not connected so it’s heat-shrinked on all tubes.
Here you can see the protection diode in series with 10K resistor going from grid to cathode. It’s heat-shrinked to prevent it from shorting with something. Grid resistor doesn’t need strain relief because it’s not connected to a “flying” lead, but directly to the board.
Discrete Fet Guitar Preamp
This preamp turned out exactly as I wanted at that time. Tons of gain! It gives awesome saturated, oozing lead tone that I can shape later with my graphic EQ pedal. Leaving the 4th preamp tube from the SLO circuit makes the preamp more versatile. With gain pot I can control the amount of distortion that comes mostly from the cold clipper stage, but with volume pot over half the last stage gets overdriven. It gives different overdrive characteristics, since it’s warmer biased and followed by the cathode follower. Backing down on gain and cranking volume sounds warmer and more compressed than doing it the other way round. By playing with two knobs I can dial anything between warmer crunch tones and heavier distortion which is very cool.
However, it must be noted that this is really a one-trick-pony for metalheads that play only high gain sounds. And it’s great at that. After few years I was beginning to miss the 3-channel SLO I built before with it’s lush cleans and nice breakup from the crunch channel, so I eventually sold this preamp and started thinking about multi-channel builds with less gain.
As any other build I just couldn’t let it be, so I fiddled around and changed a couple of values. I noticed that bass is a bit flubby when doing that lower-gain palm mute rhythm, so I did three things:

0 Response to "Diy Preamp Guitar"
Posting Komentar