This tutorial will show you how to control the Guitar Rig 6 plugin via Ableton Live and the pedalboard in free mode.
We will use the Guitar Rig Macros in order to have a homogeneity of controls in Ableton. Macros allow you to assign a global control to any parameter in the rack. Thus, if we change the Guitar Rig preset, the midi notes assigned to the macro will be the same regardless of the preset selected.

The macros are saved with the presets in Guitar Rig. The default presets are read-only and cannot be saved. We must therefore duplicate the presets as user presets. To do this, we open a preset that interests us and click on the save icon as shown below:
Ableton Live Controllers For Guitarists
We turn the first control into a knob instead of a fader. We right-click on the first controller and select Toggle Knob/Button Mode:
We will drag the first controller by selecting the number and dragging it to the on/off button of the rack level that interests us
Note, we have the possibility of assigning several parameters to a single macro controller: drag the controller to several rack parameters and these will appear in the lower part of the macro (expert mode must be activated, arrows below):
Converting Audio To Midi — Ableton Reference Manual Version 11
The first step is to make the Guitar Rig button known to Ableton. We click on configure in the Guitar Rig 6 effect of Ableton:
In this case, this makes 2 controllers appear, since pressing the On/Off button effectively stops/starts the stage. We will keep only the controller beginning with Macro.
Then we are going to midi map these controllers in order to assign them to the buttons and to the expression pedals that interest us. We first switch the pedalboard to free mode by pressing the up button for more than a second. We then switch to midi map mode in Ableton :
How To Use Guitars With Ableton Live 10
Ableton now waits for a midi signal to be sent to assign it to the controller. We press the button of the that interests us (still in free mode).
We select the second controller and move the first expression pedal. Finally, we select the third wha-wha controller and move the second expression pedal. All the midi assignments are now available:
We will send midi signals to Guitar Rig through Ableton. As soon as a clip with a particular midi signal is launched (at the start of a scene, for example), the preset will change in Guitar Rig.
The Most Flexible Guitar Midi Setup For Gig Performer
Note that there is a limitation in Guitar Rig when it comes to preset filters: you will have to be in Custom mode, so you can choose the order of the presets in the list:
First of all, we create a new midi track that will be dedicated to sending the midi signals for changing presets to Guitar Rig.
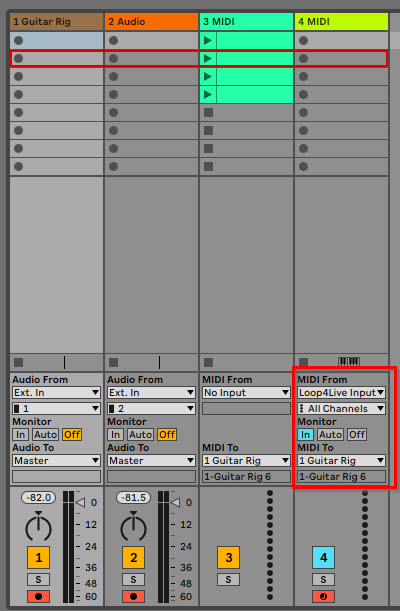
We send the midi signals of this new track to the Audio track that contains the Guitar Rig plugin (named 1. Guitar Rig in this example). In MIDI To we select the track :
Not Getting A Guitar Signal On Ableton
The list of presets is available in Ableton via the drop-down list present in the plugin (be careful to be in Custom mode when selecting presets in Guitar Rig otherwise the order of the presets will be incorrect):
We will indicate that the midi message corresponding to this clip is a program change with the value corresponding to the position of the Guitar Rig preset in the list:
Preset 002 Acid Screamer corresponds to program change 1, preset 003 Acid Screamer 1 corresponds to program change 2, preset 004 AC Tremolo corresponds to program change 3, preset 005 Acid Talk corresponds to program change 4 and preset 006 AC Acid Doplhins corresponds to program change 5, etc
Amp & Cabinet Fx In Live
Be careful, the first preset is not selectable (Guitar Rig bug?): you will have to put a garbage preset in the first position.
You can navigate the Guitar Rig presets with the up/down buttons of the pedalboard in free mode. To do this, assign dedicated notes to the up and down buttons in the free_mode_midi_map.ini file contained in the remote scripts (see paragraph 7B. The Free Mode of the manual). Next, create a new midi track in Ableton in order to forward the midi messages from the pedalboard to Guitar Rig. In this midi track, select Input in the MIDI From section and Guitar Rig in the MIDI To section. Also check In in the Monitor section. The MIDI signals from the pedalboard are thus transferred to Guitar Rig.

In Guitar Rig, right-click on the preset up button and select Learn MIDI Control. Then activate the up button on the pedalboard (set to free mode). Do the same for the preset down button.
Playing Presets In Ableton Live
Now that Ableton is transferring MIDI signals from the pedalboard, you can assign what you want in Guitar Rig using MIDI Learn to control all the parameters of the racks.
The technical storage or access is strictly necessary for the legitimate purpose of enabling the use of a specific service explicitly requested by the subscriber or user, or for the sole purpose of carrying out the transmission of a communication over an electronic communications network.
The technical storage or access is necessary for the legitimate purpose of storing preferences that are not requested by the subscriber or user.
Using Virtual Instruments In Ableton Live
The technical storage or access that is used exclusively for statistical purposes. The technical storage or access that is used exclusively for anonymous statistical purposes. Without a subpoena, voluntary compliance on the part of your Internet Service Provider, or additional records from a third party, information stored or retrieved for this purpose alone cannot usually be used to identify you.
The technical storage or access is required to create user profiles to send advertising, or to track the user on a website or across several websites for similar marketing purposes.Screen 1: Bass, piano and drum MIDI clips (top Scene) are mixed to audio, which is then converted to new bass, piano and drum MIDI clips.

Live’s melody, harmony and drum audio‑to‑MIDI conversion algorithms are typically used to extract MIDI sequences from single‑part audio clips in order to either edit the parts or use different instruments to play them. You’ll find a detailed analysis of that process in the July 2013 Live column. Here we’ll look at a different use for conversion: deciphering individual parts in a multi‑part audio clip. We’ll also take a look at some of the new features in Live 11.1.
Download Electric Bass Sounds & Max For Live Utilities For Free Stuff Friday
This example starts with three MIDI clips, renders their mix to a single audio clip and then uses Live’s three conversion algorithms to extract melody, harmony and drum MIDI clips to compare to the original MIDI clips. The reason for starting with MIDI clips is to make clear the differences that can crop up when trying to analyse a complex audio clip (the usual starting point) using the conversion algorithms. Conversion does work best on single‑part audio clips of the appropriate type, but as we’ll see, it can be surprisingly useful for deciphering more complex audio material.
In Screen 1, I’ve started with bass (Funky Retro Bassline C Minor 145 bpm), piano (House 90s C Minor 128 bpm) and drum (Hip Hop Swing 105 bpm) MIDI clips from Live’s Core library. Each of the these MIDI clips comes with its own Live Instrument Rack, which is imported automatically when you insert the clip on an empty MIDI track. Rendering their mix creates a single audio clip, which I’ve inserted on a new audio track. You access Live’s three conversion algorithms for a selected audio clip either from Live’s Create menu or from the clip’s or clip editor’s context menu (right‑click/Control‑click). Applying one of the conversion algorithms to the audio mix results in a MIDI clip on a new MIDI track holding a default instrument specified in your User Library/Defaults/Audio to MIDI folder. In this example, the best comparisons result from moving the MIDI‑conversion clips back to the MIDI tracks holding the original MIDI clips so that they play their intended instruments.
The before‑and‑after comparison when playing all three clips is surprisingly listenable, but when you compare them one instrument at a time, the inaccuracies stand out. The converted bass has some wrong notes, which are mostly stolen from the piano part. The converted harmony is a bit more accurate, but has missed some notes and has also stolen some from the bass. Drum conversion is always restricted to three kit pieces (kick, snare and hi‑hat) and places notes at every transient marker in the original audio track. (Transient markers are the targets in all the conversion algorithms.) One way to improve on the drum conversion is to make a copy of the source audio clip, delete each transient marker where there is no drum and use that clip for the drum conversion. (You could do that for the melody and harmony parts as well, but it’s probably not worth the effort.) None of the inaccuracies are too surprising, but they show you what to look for when trying to convert a multi‑part audio clip to MIDI clips. The bottom line is that, in spite of the shortcomings, you can get a lot of useful information.
Guitar Chords To Midi
Conversion does work best on single‑part audio clips of the appropriate
0 Response to "Ableton Live Guitar To Midi"
Posting Komentar